
Cauliflower Grilled Cheese

title 1
Cauliflower Grilled Cheese
⏱️ cook time 18 minutes
🍽️ servings 2
⚡ Difficulty easy

intro

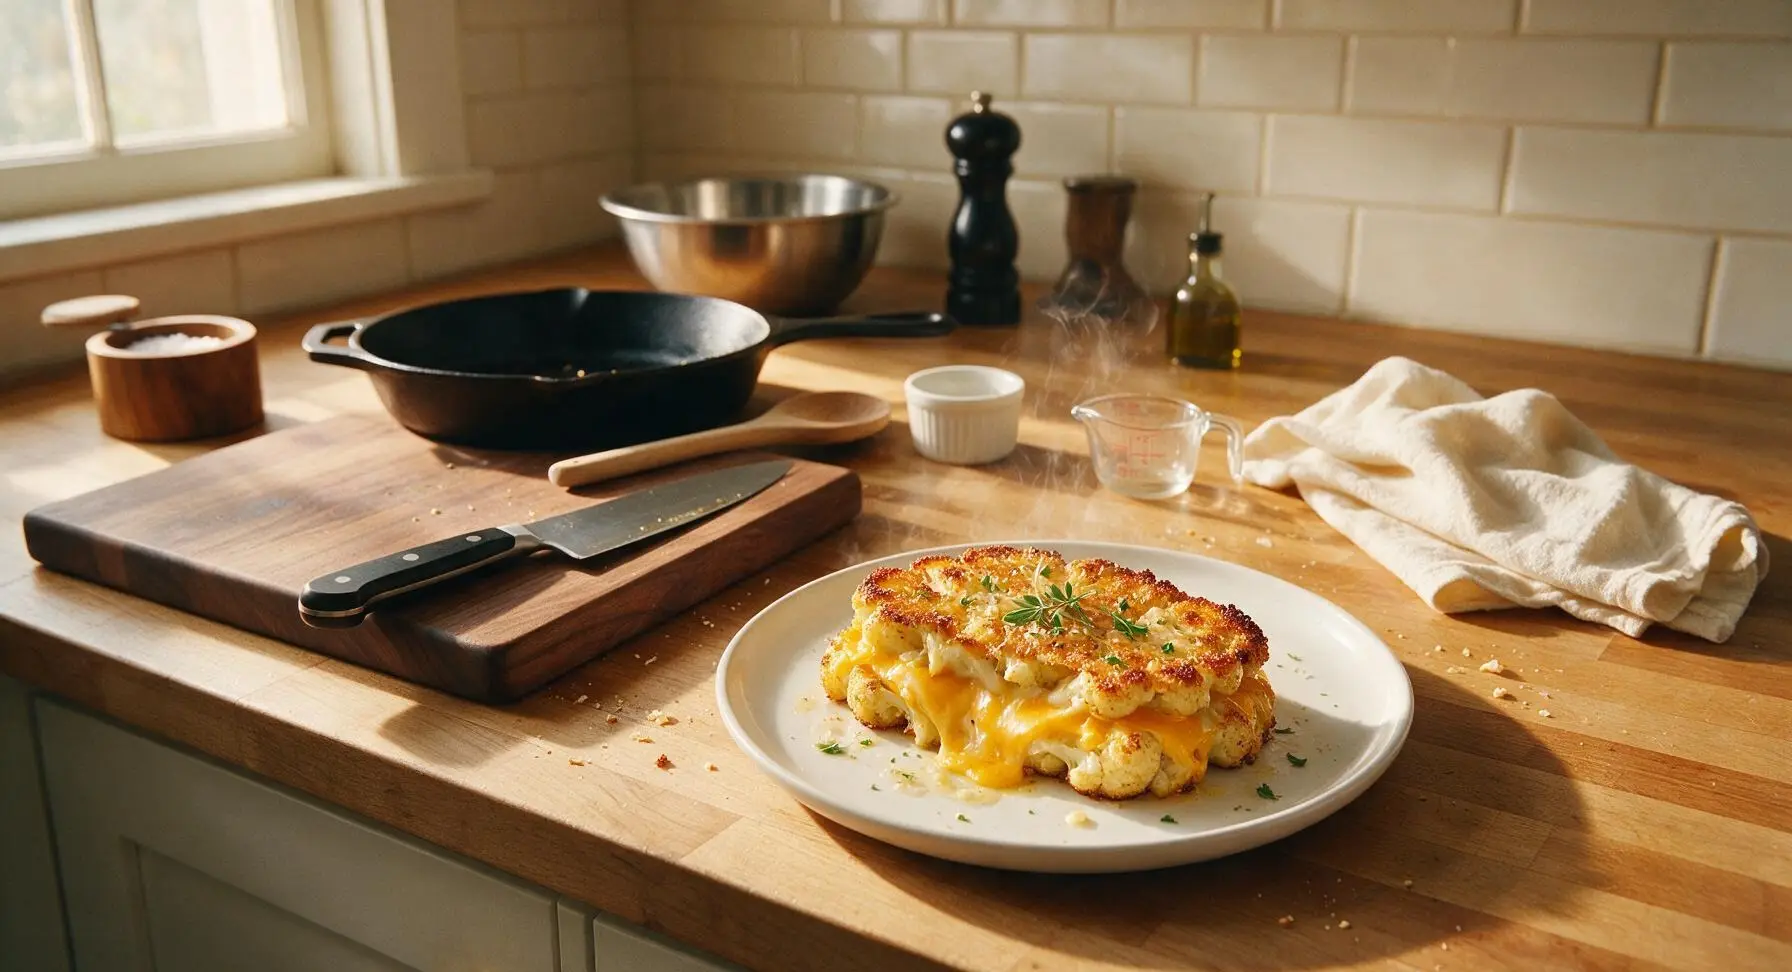
Crispy, golden cauliflower slices stand in for bread in this gluten-free twist on classic grilled cheese, oozing with melted sharp cheddar and coated in garlicky butter for cozy, satisfying comfort.

Ingredients
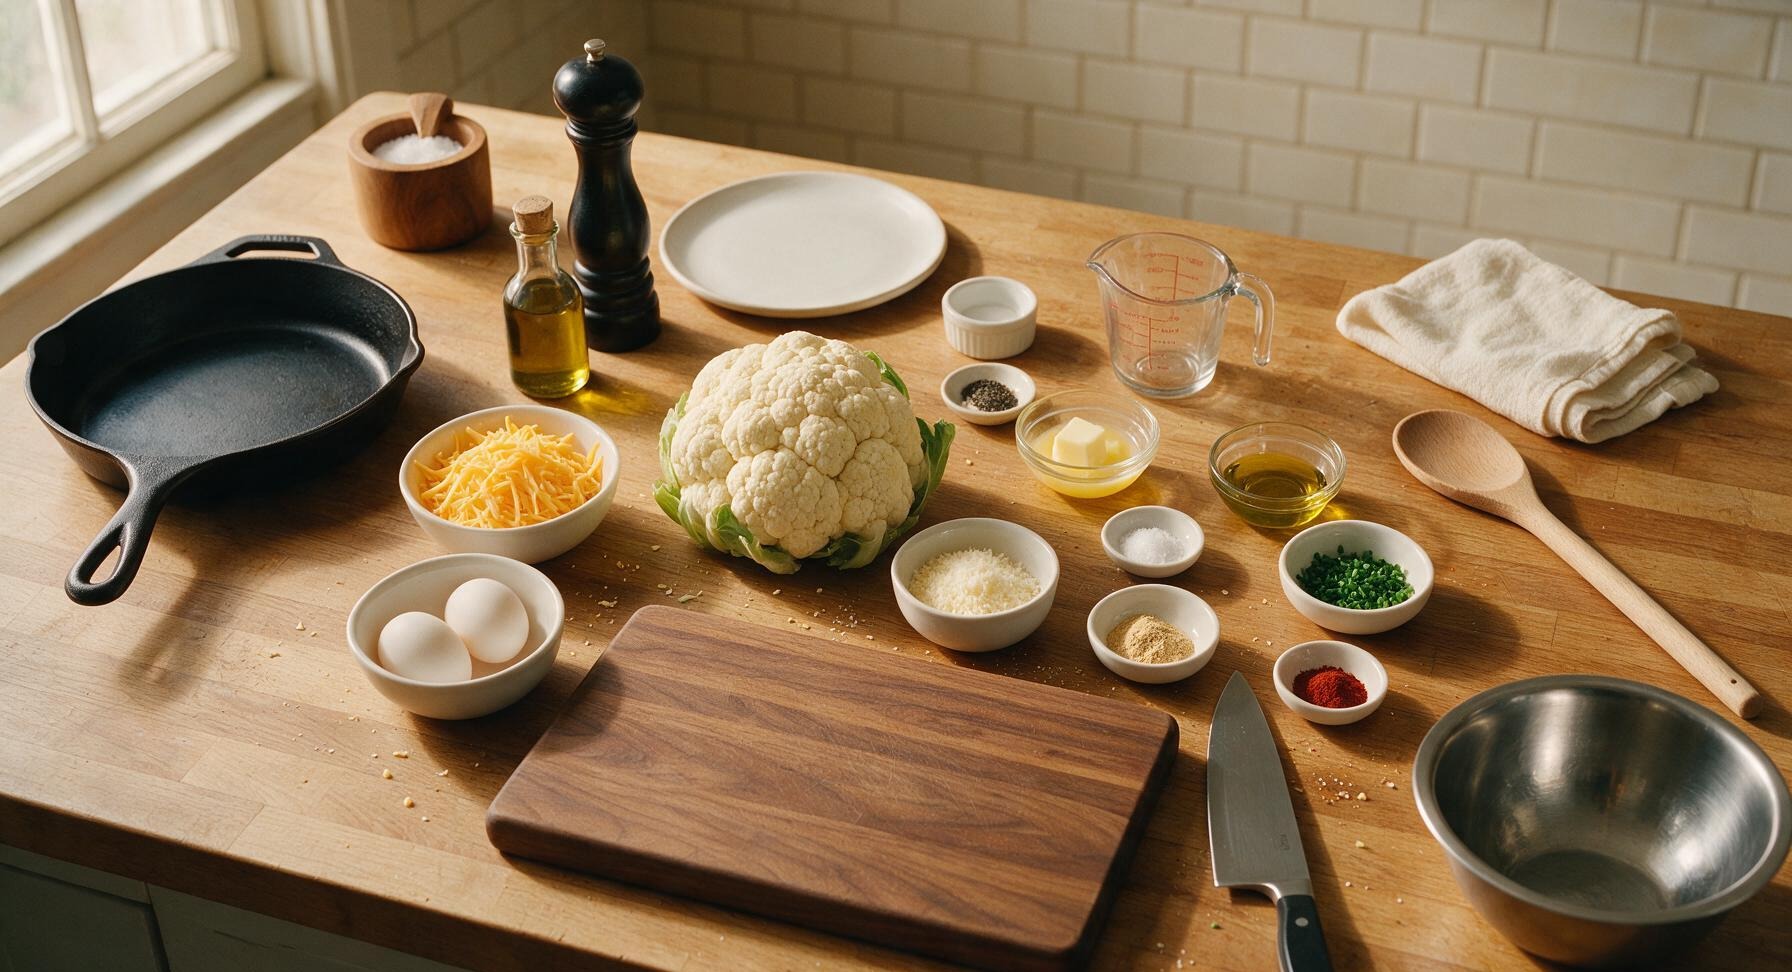
Medium cauliflower head 600g (1 medium)
Sharp cheddar cheese 100g, shredded
Large eggs 2
Grated parmesan cheese 3 tbsp (25g)
Garlic powder 1 tsp
Smoked paprika ½ tsp
Fine sea salt ⅛ tsp
Freshly ground black pepper ⅛ tsp
Unsalted butter 1 tbsp (14g)
Extra virgin olive oil 1 tbsp
Fresh chives 2 tbsp, finely chopped

Steps

1

Grate Cauliflower Florets

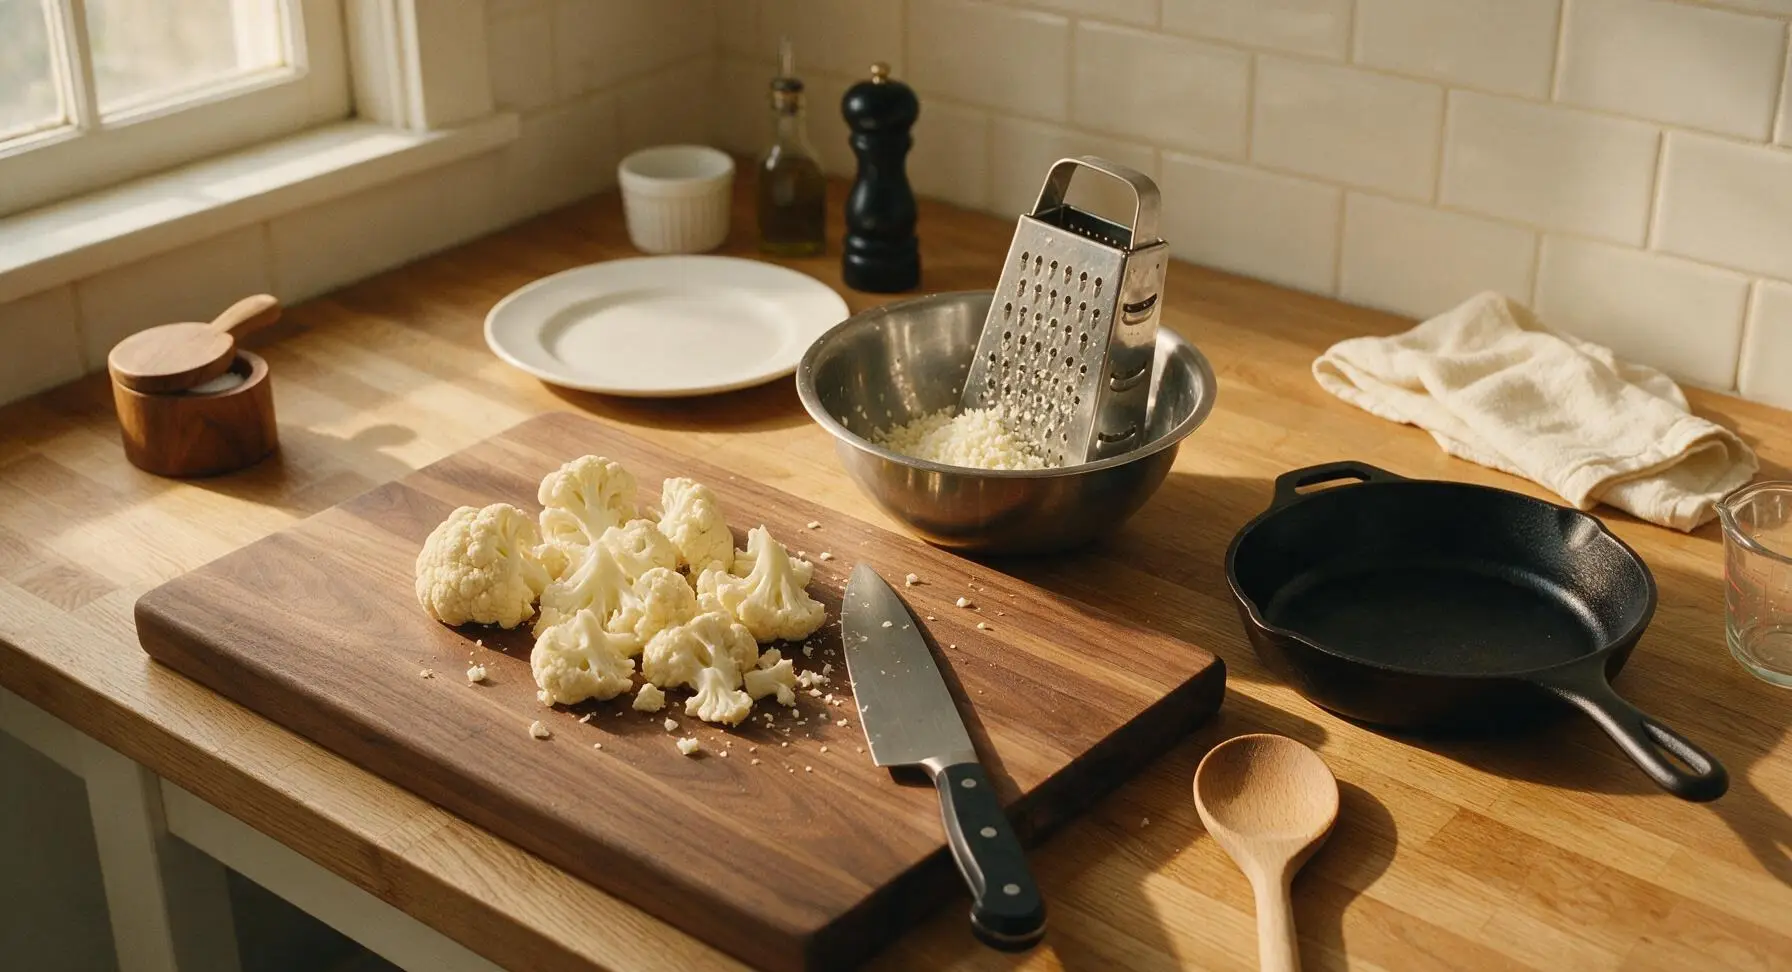
Pull outer green leaves from the cauliflower head, then cut the head into large florets, discarding the thick, woody central core. Hold the box grater steady on the edge of the stainless steel mixing bowl, and grate all florets on the largest grating holes to create fine, rice-sized pieces. You will end up with roughly 4 cups of loose, riced cauliflower in the bowl. A few scattered crumbs on the cutting board are normal.
Step 1
step1:Grate Cauliflower Florets
2

Press Cauliflower Dry

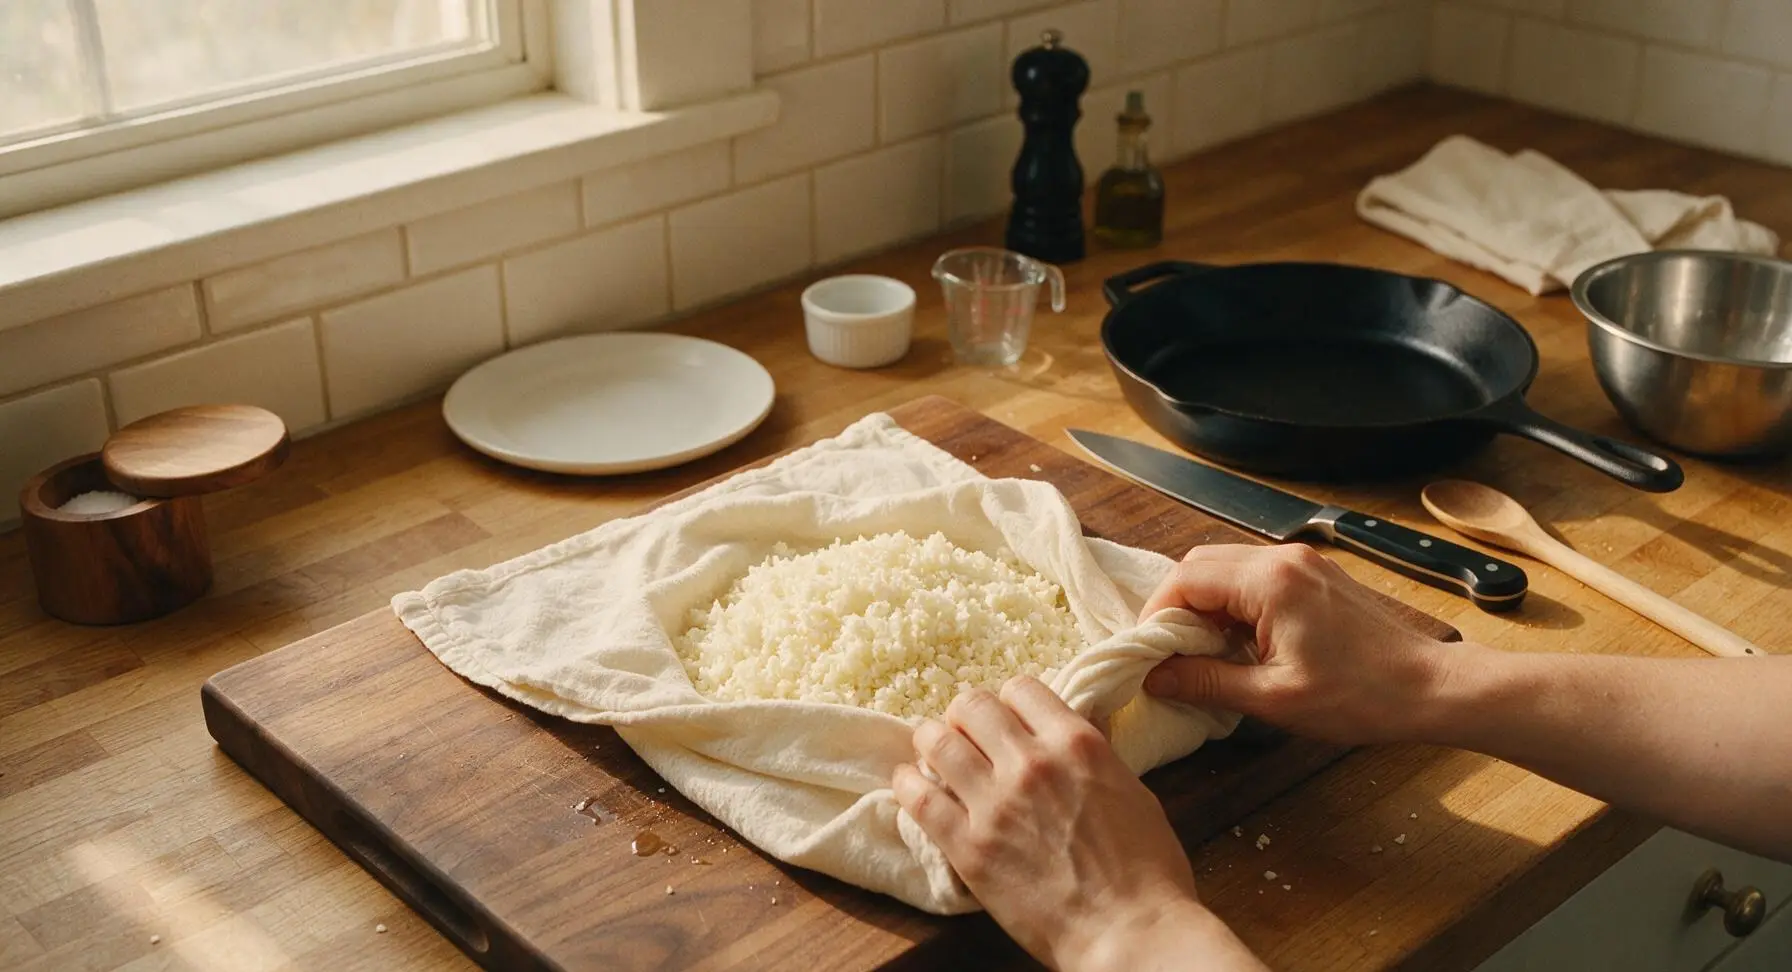
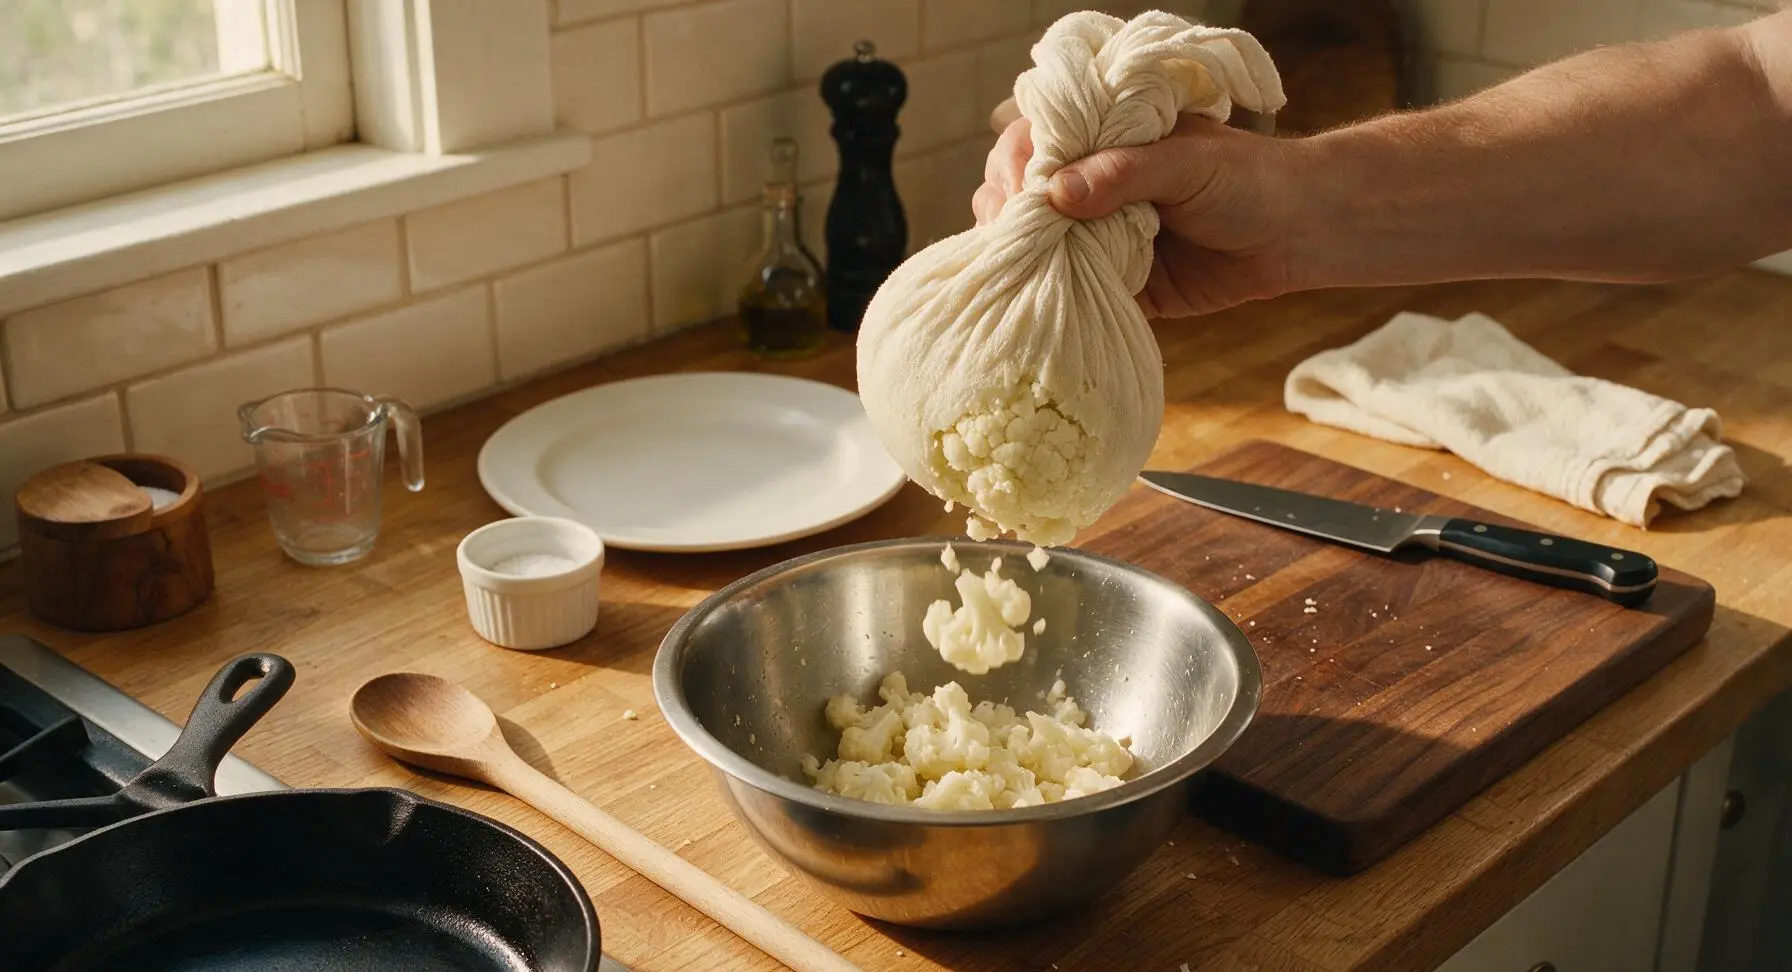
Transfer all riced cauliflower to the center of the unbleached cotton kitchen towel laid flat on the cutting board. Gather the towel edges tightly to form a sealed pouch around the cauliflower, then twist and squeeze firmly over the sink area (off frame) to remove as much excess moisture as possible. Continue squeezing for 2-3 minutes until no more water drips from the towel; you will remove at least ½ cup of liquid. Fully dried cauliflower is non-negotiable for crispy, sturdy 'bread' slices. Return the squeezed, compact cauliflower to the mixing bowl.
Step 2
step2:Press Cauliflower Dry
Step 2
step2:Press Cauliflower Dry
3

Mix Slice Base

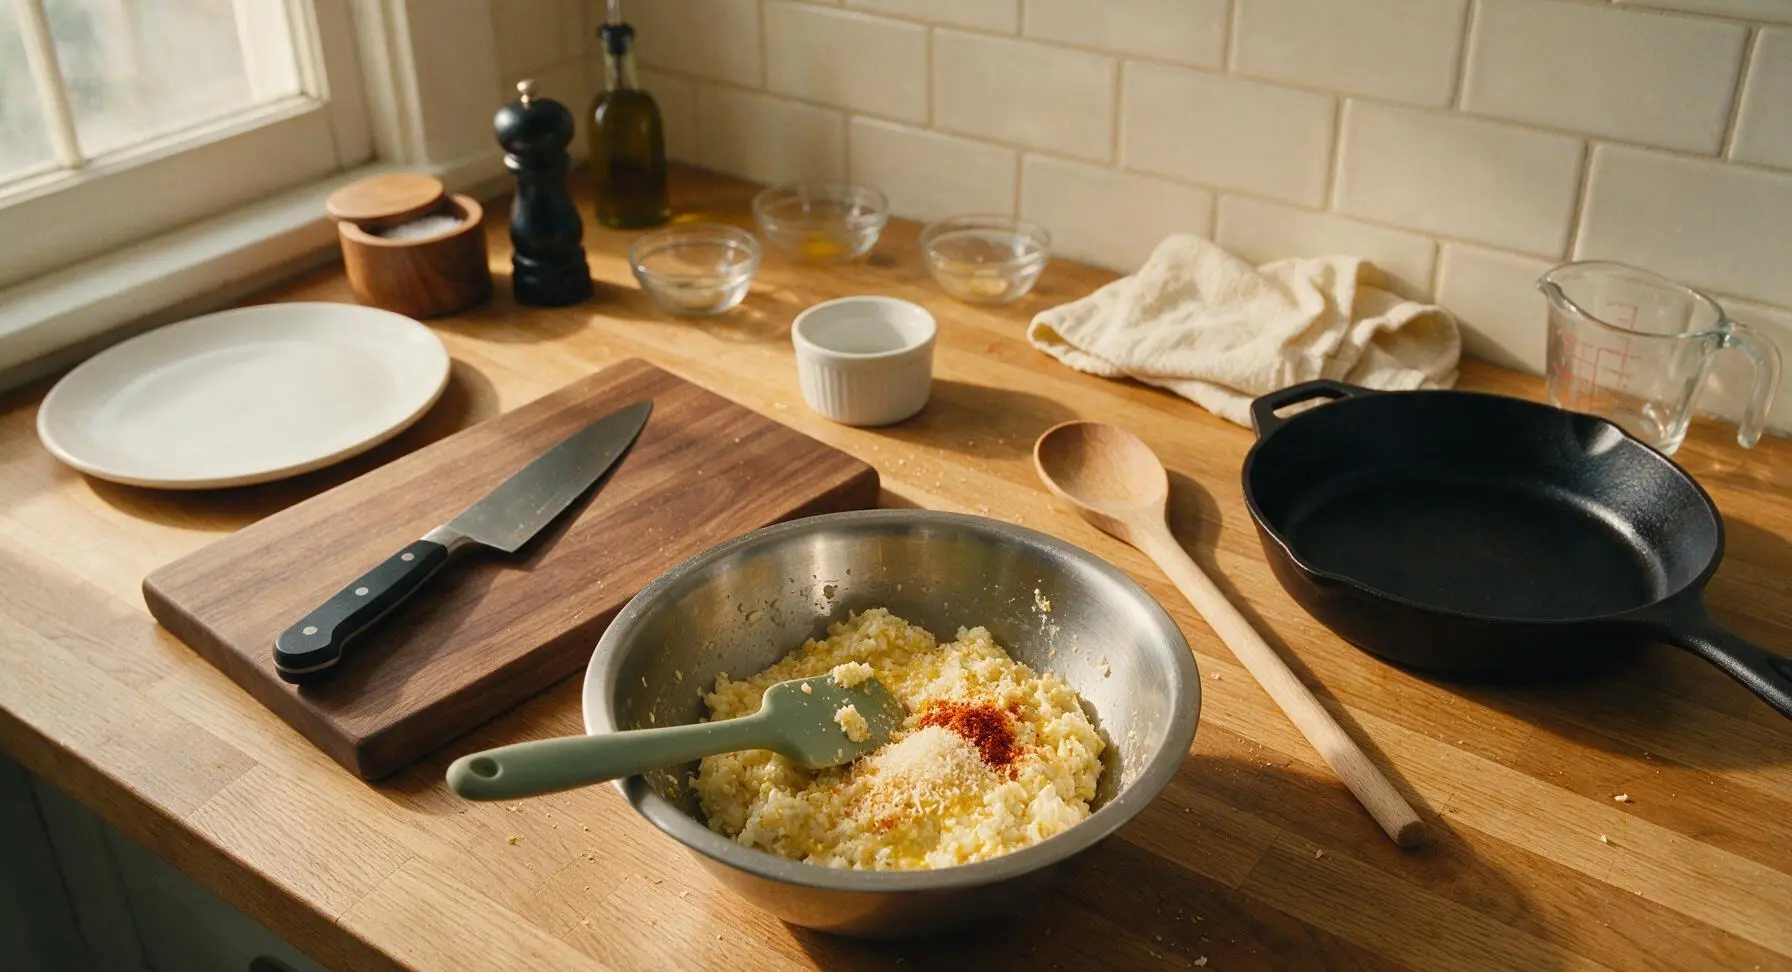
Crack the 2 eggs into a small prep bowl, beat lightly with a fork, then pour into the mixing bowl with the dried cauliflower. Add the grated parmesan, garlic powder, smoked paprika, fine sea salt, and black pepper. Stir thoroughly with the sage green silicone spatula until all ingredients are evenly combined, forming a thick, moldable mixture that holds its shape when squeezed into a clump.
Step 3
step3:Mix Slice Base
4

Form Cauliflower Slices

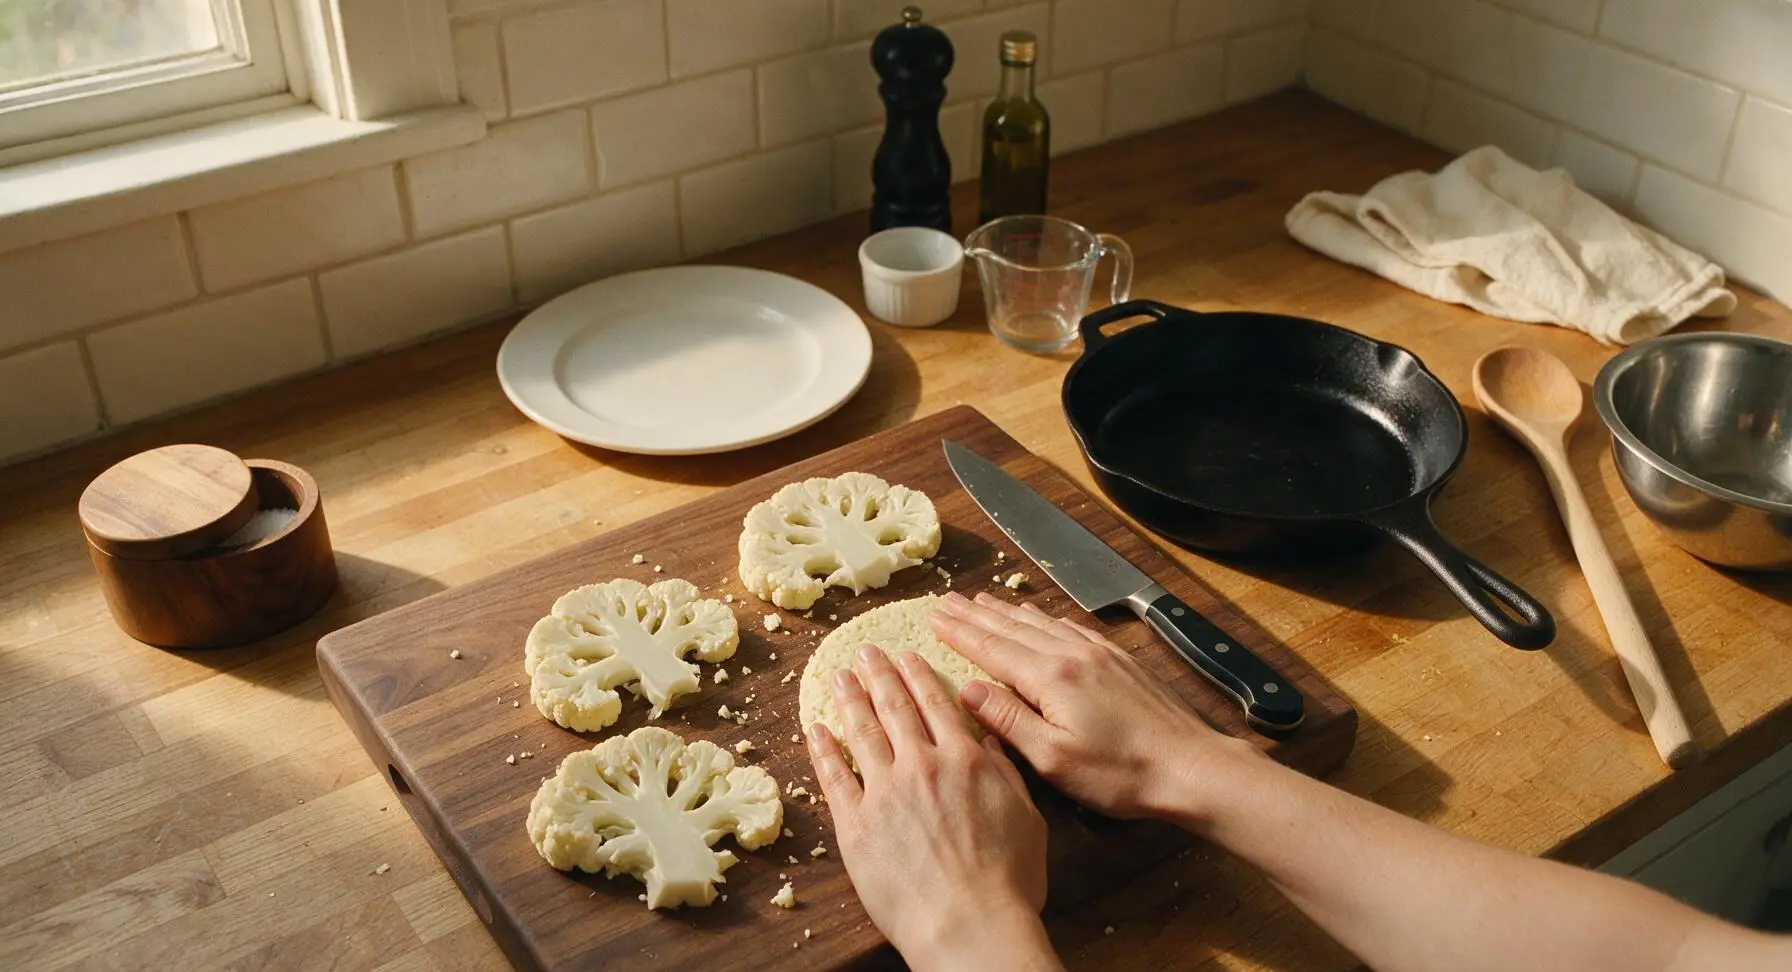
Divide the cauliflower mixture into 4 equal portions (approximately ½ cup each). Place each portion on the bamboo cutting board, pressing firmly with clean hands to form flat, even ½-inch thick ovals, roughly 10cm x 12cm (the size of a standard sandwich bread slice). Smooth the edges of each slice to eliminate thin, crumbly spots that could break during cooking.
Step 4
step4:Form Cauliflower Slices
5

Pan-Fry Cauliflower Slices

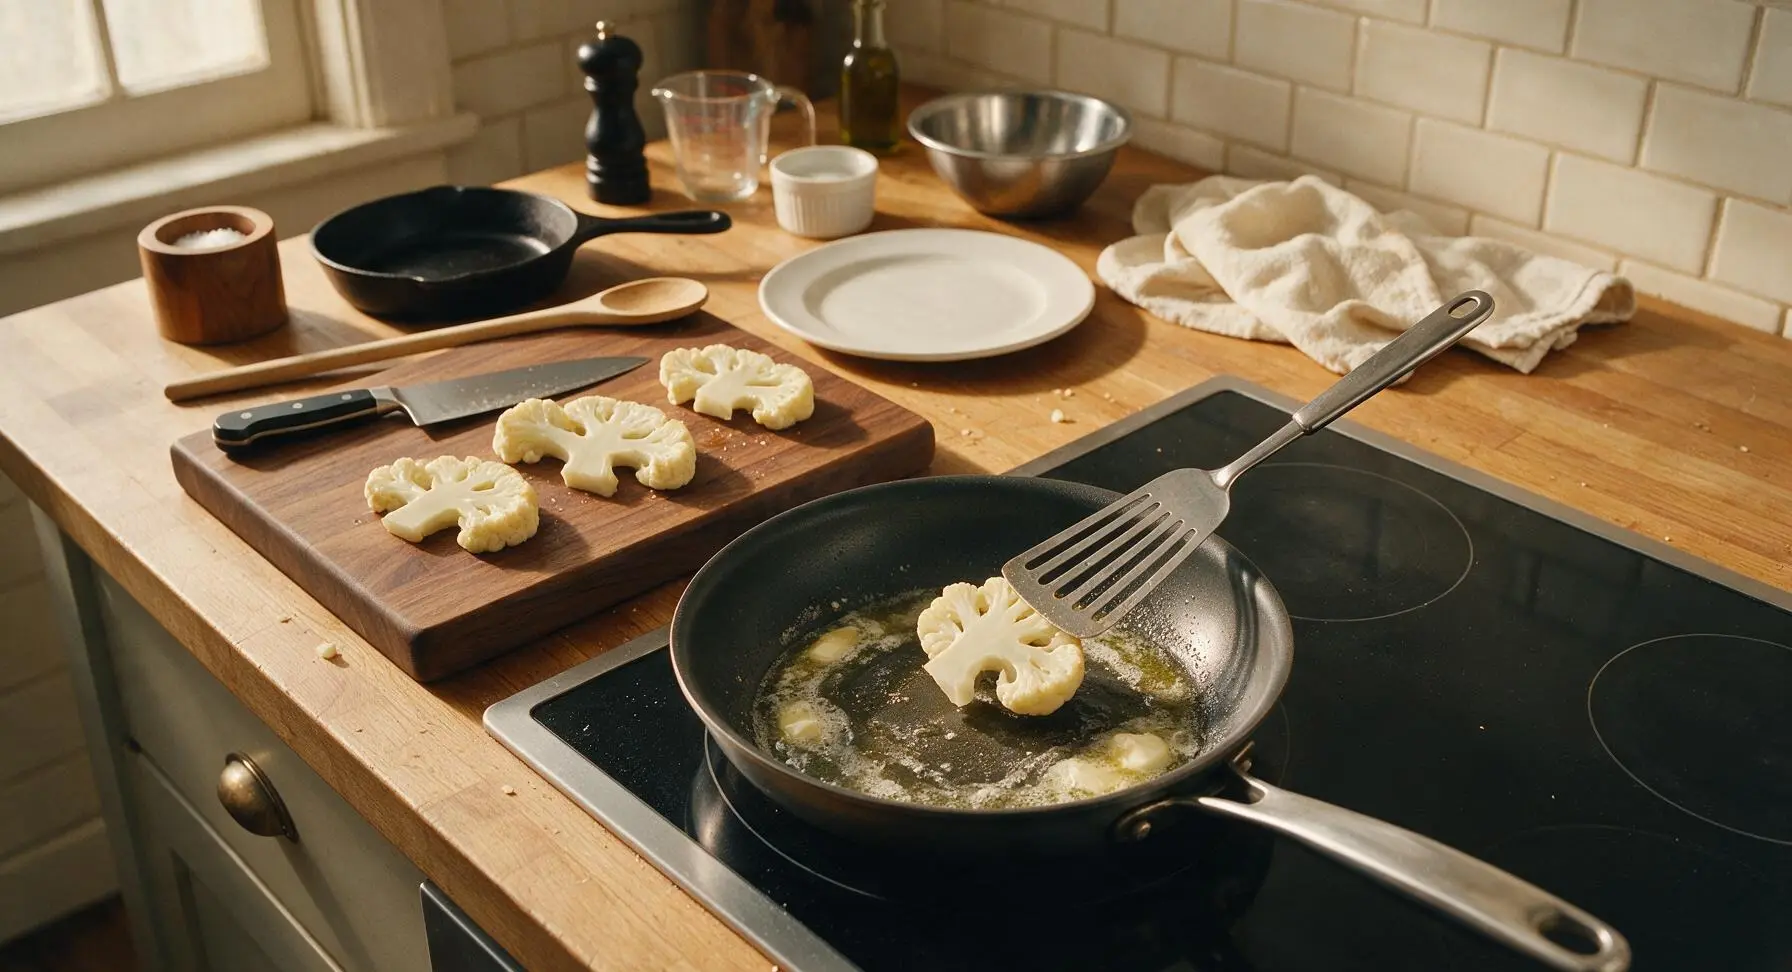
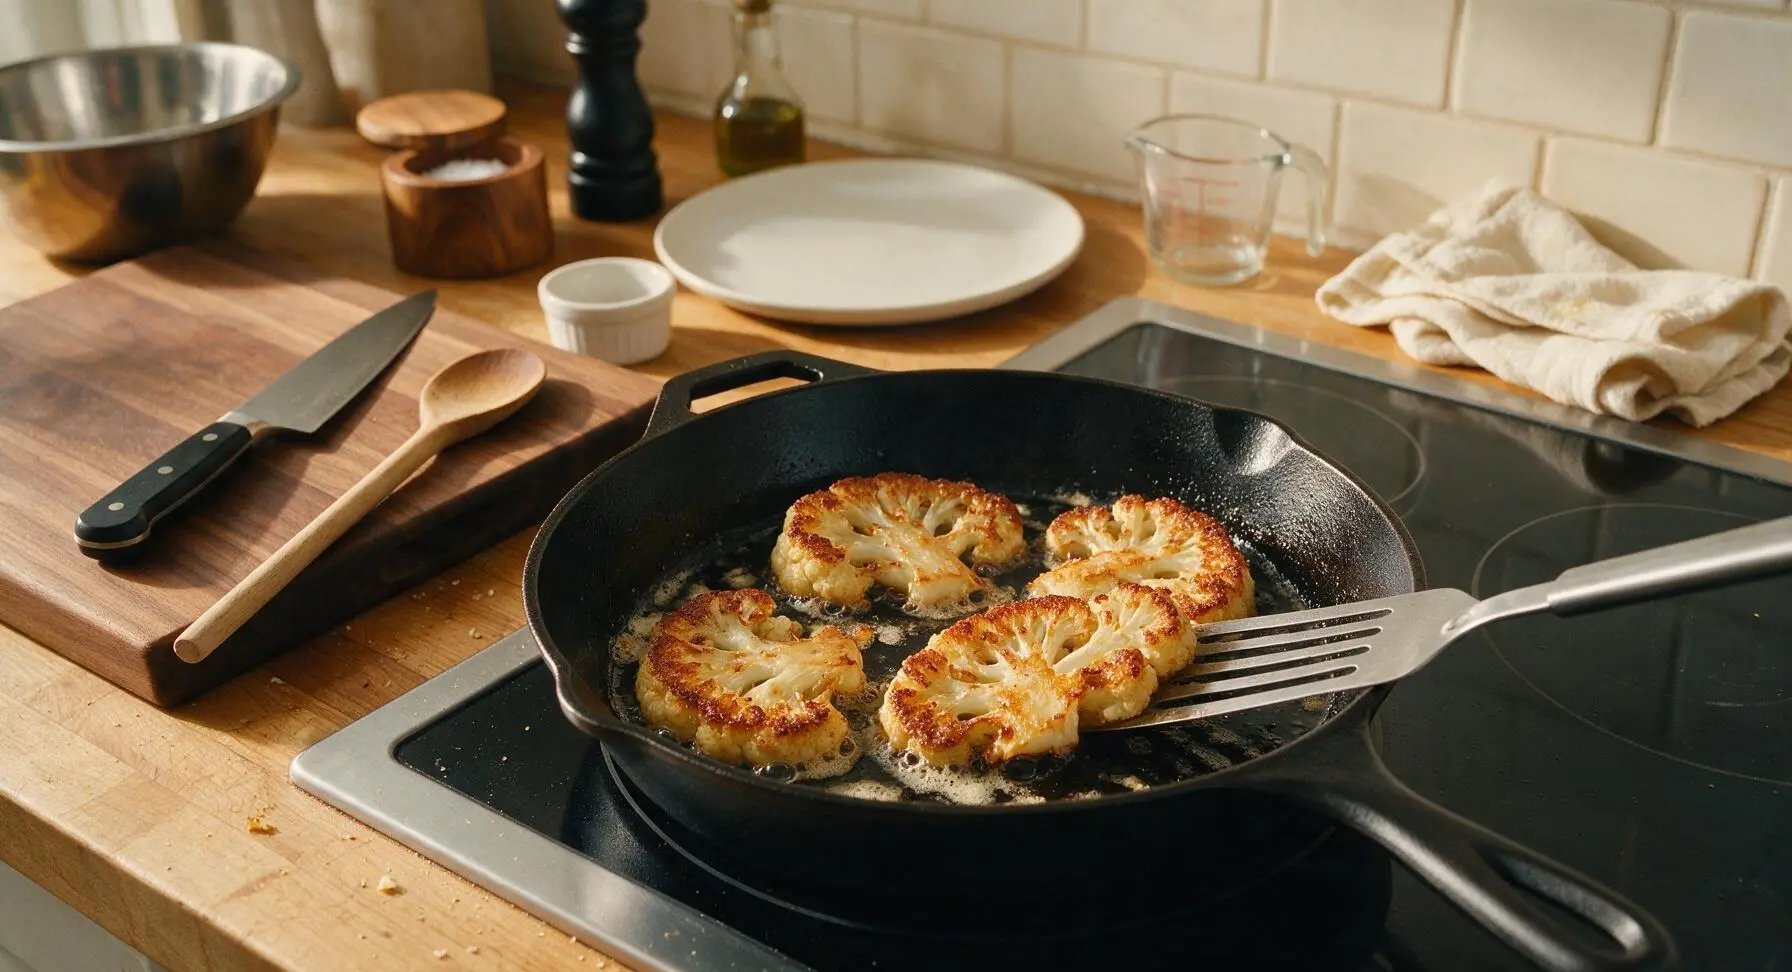
Place the 10-inch non-stick skillet on the central induction zone, heat to medium (350°F / 175°C). Add 1 tablespoon olive oil and ½ tablespoon butter, heating until butter is fully melted and foaming subsides. Carefully lay all 4 cauliflower slices in the skillet in a single layer. Cook for 5-6 minutes on the first side, until deep golden brown and crisp on the bottom, then flip each slice with the slotted metal turner. Cook the second side for another 5-6 minutes until equally crisp and golden.
Step 5
step5:Pan-Fry Cauliflower Slices
Step 5
step5:Pan-Fry Cauliflower Slices
6

Layer Cheese Filling

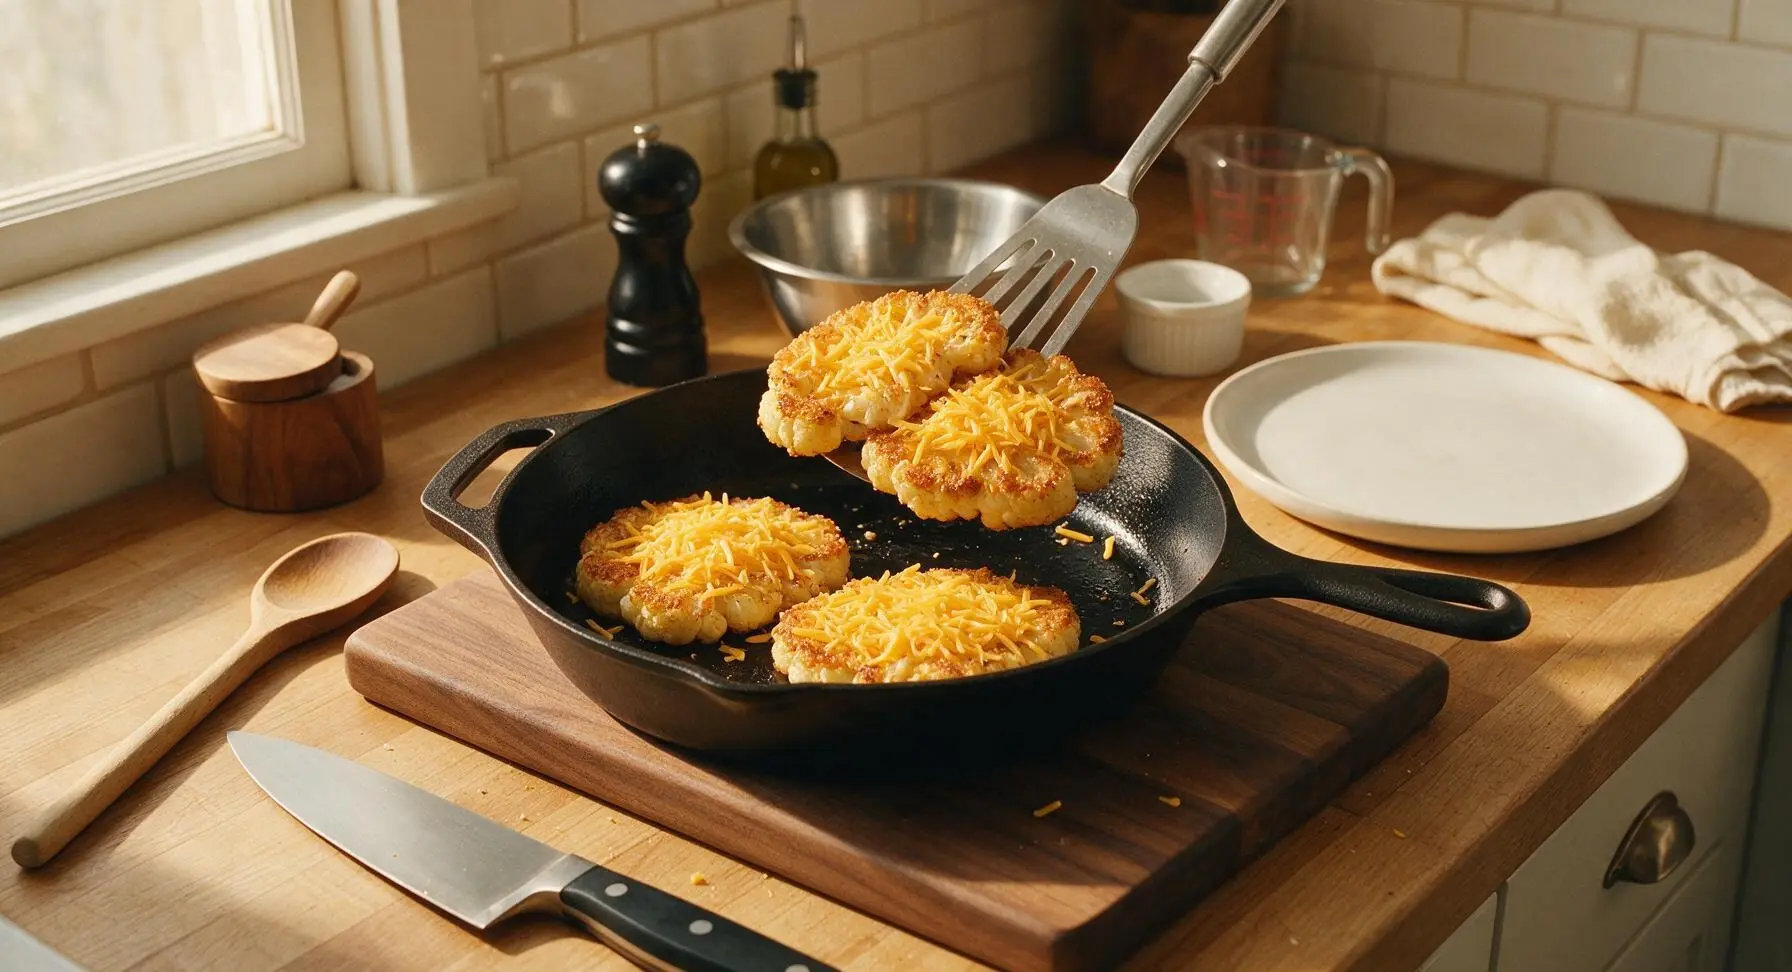
Once all cauliflower slices are crispy on both sides, leave two slices in the skillet. Sprinkle half the shredded sharp cheddar (50g total across two sandwiches) evenly over each of the two slices in the pan, leaving a ¼-inch border around the edges to prevent cheese from oozing out excessively as it melts. Top each cheese-covered slice with one of the remaining cooked cauliflower slices, pressing down gently with the turner to form a tight sandwich.
Step 6
step6:Layer Cheese Filling
7

Grill to Melt Cheese

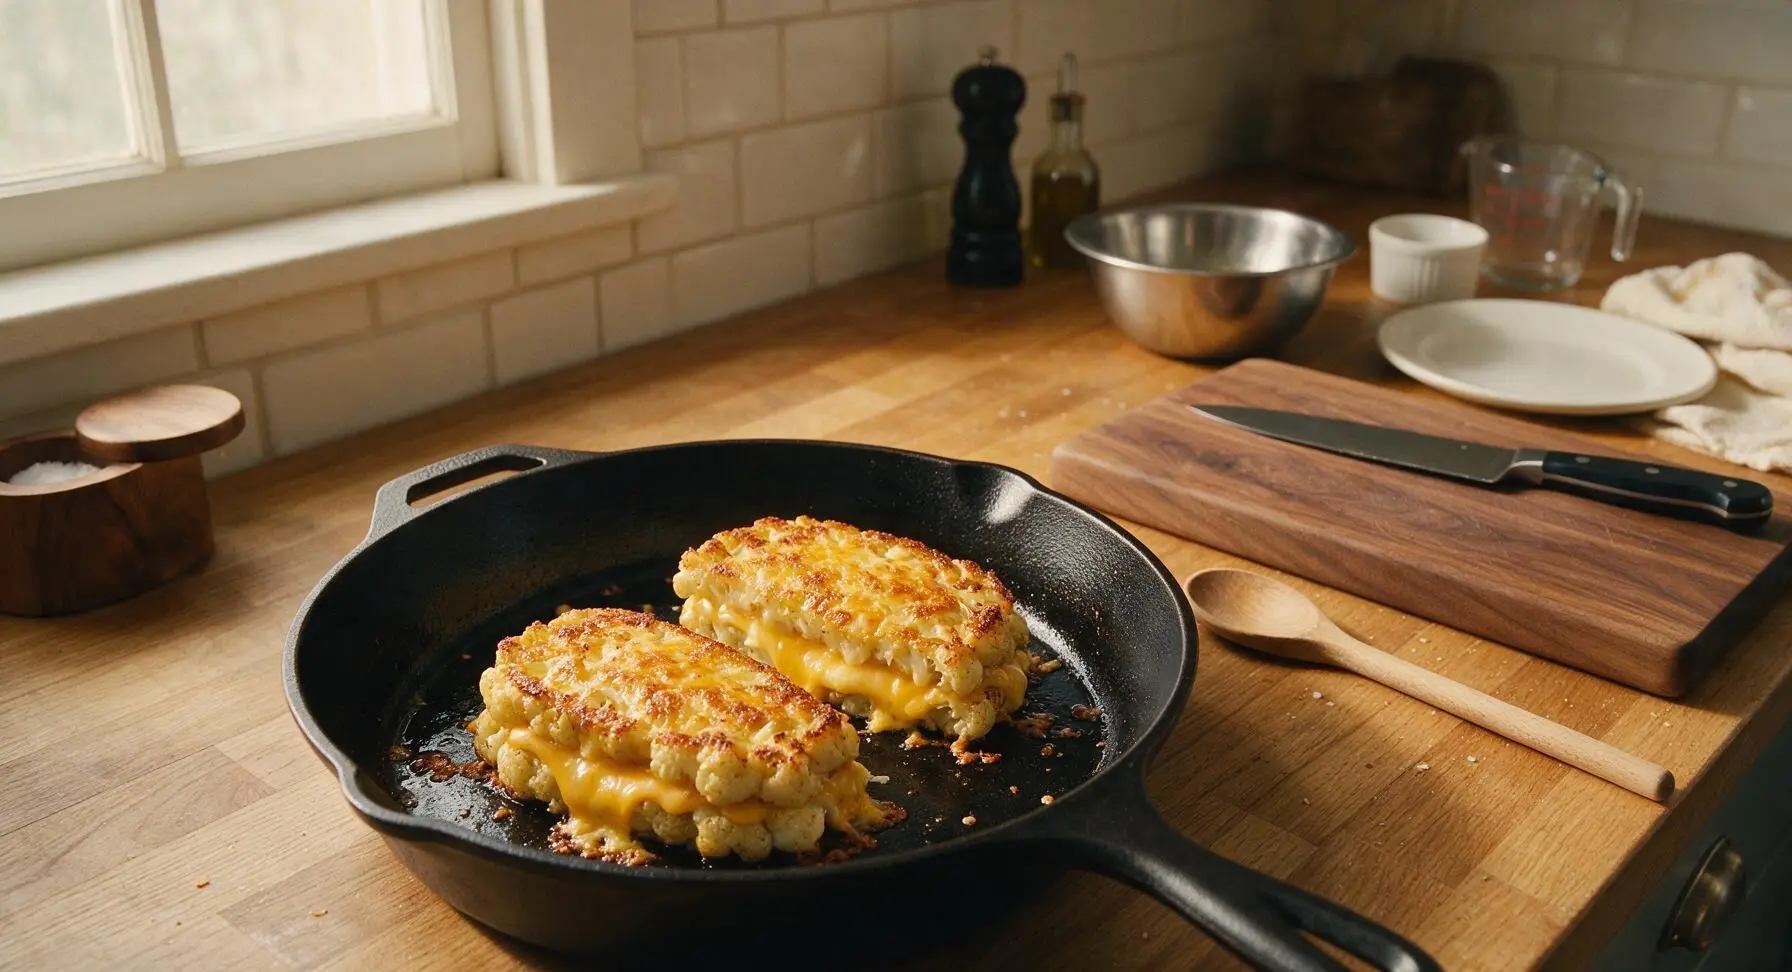
Reduce heat to medium-low (325°F / 160°C). Cook the assembled sandwiches for 3 minutes on the first side, then flip with the turner. Add the remaining ½ tablespoon of butter to the pan, tilting to let it melt around the sandwiches. Cook for another 3 minutes on the second side, pressing gently with the turner occasionally, until the cheddar is fully melted and oozing slightly at the edges, and the exterior of the cauliflower slices is deep golden and crisp.
Step 7
step7:Grill to Melt Cheese
8

Plate and Garnish

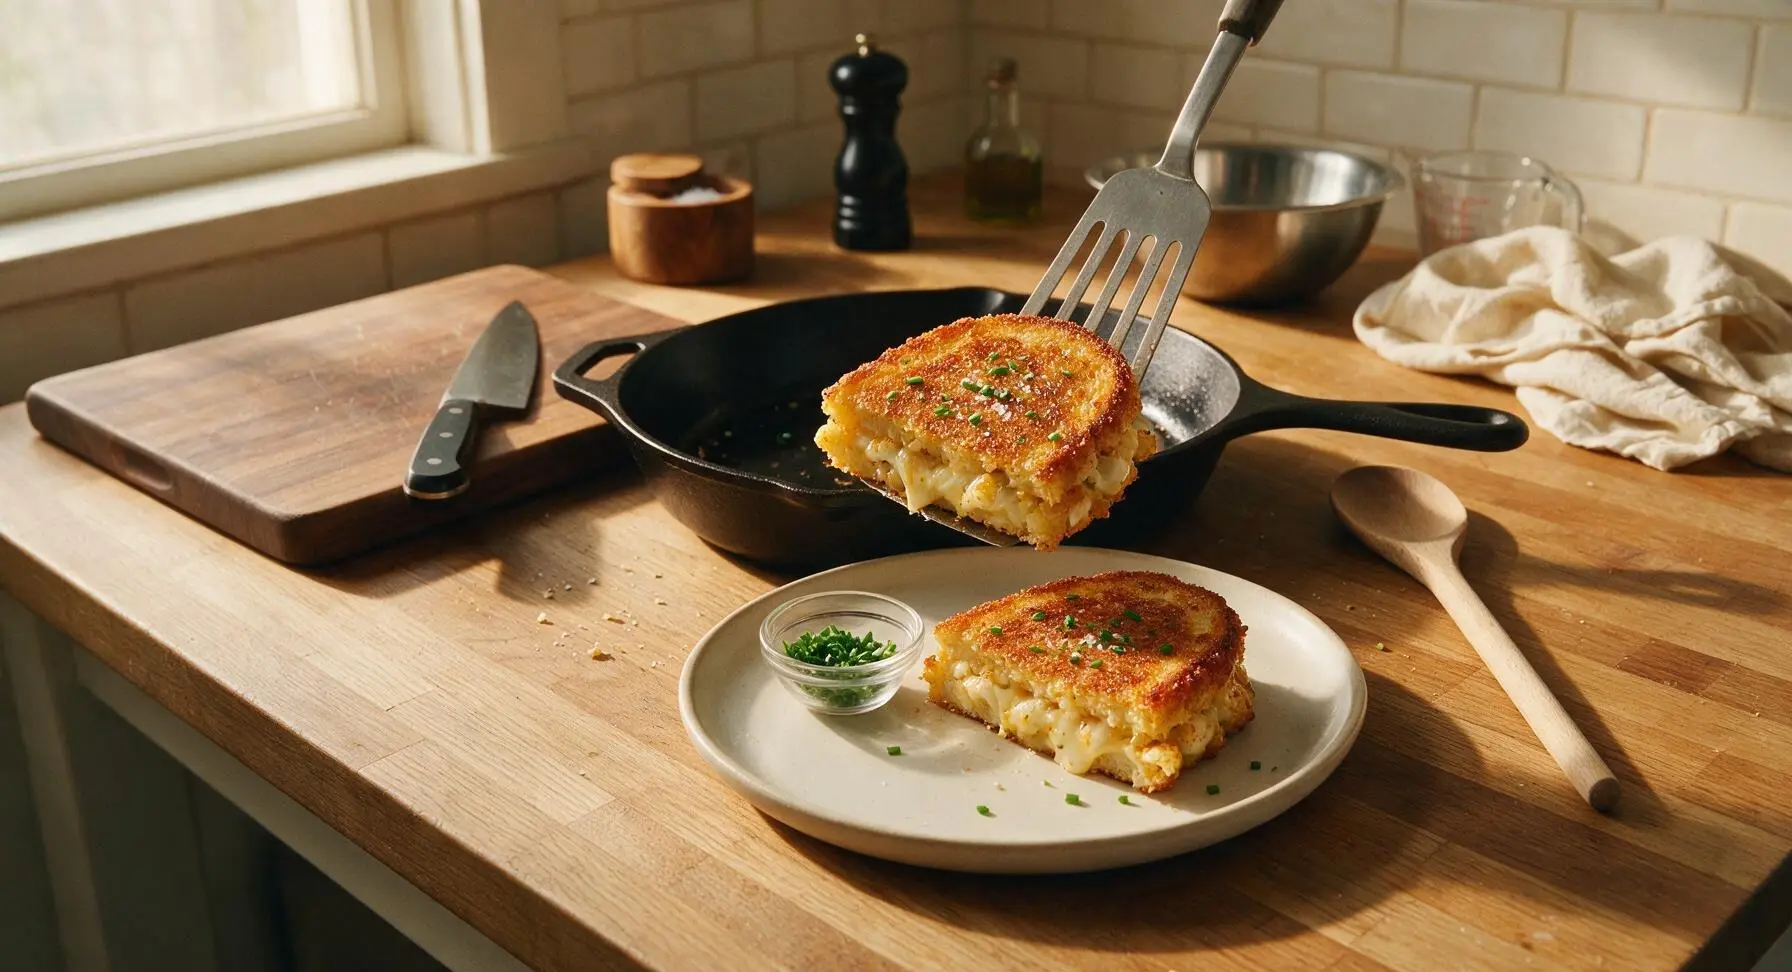
Use the slotted metal turner to lift each finished sandwich from the skillet, transferring to the matte off-white ceramic dinner plates. Cut each sandwich diagonally into two triangular halves, then sprinkle with finely chopped fresh chives and a tiny pinch of flaky sea salt. Let rest 1 minute before serving to allow the cheese to set slightly.
Step 8
step8:Plate and Garnish

Tips

1.Squeeze as much moisture as humanly possible from the riced cauliflower: excess water is the #1 cause of soggy, falling-apart cauliflower bread. For extra dryness, microwave the riced cauliflower for 3 minutes on a plate before squeezing—this helps release trapped steam and moisture for an even crispier result.
2.Don’t rush the browning process: cooking cauliflower slices over medium (not high) heat ensures the exterior gets deeply golden and crisp without burning, while the egg and parmesan binder sets fully to hold the slice shape.
3.Use a 50/50 mix of butter and olive oil for cooking: olive oil raises the smoke point to prevent the butter from burning and turning bitter, while butter adds the rich, nutty, classic grilled cheese flavor that makes the sandwich feel indulgent.


✨ You May Also Like

Main Course
🍜 United Kingdom

A showstopping classic of tender seared beef, savory mushroom duxelles, and crisp prosciutto wrapped in flaky golden puff pastry, baked to juicy perfection.

⏱️ 2 hours 1Main Course ★ 4.7
Main Course
🍜 India

Tender charred marinated chicken simmered in a rich, spiced creamy tomato sauce, this iconic Anglo-Indian curry pairs perfectly with basmati rice or warm naan.

⏱️ 50 minuteMain Course ★ 4.6
Main Course
🍜 Thailand

Classic tangy, sweet, and savory Thai stir-fried rice noodles with shrimp, tofu, and crunchy garnishes, balancing all five core Thai flavor profiles.

⏱️ 30 minuteMain Course ★ 4.5
Main Course
🍜 United Kingdom

Crispy golden beer-battered cod and fluffy double-fried chips, served with tangy tartar sauce and malt vinegar: the timeless, beloved British pub comfort classic.

⏱️ 45 minuteMain Course ★ 4.7
Main Course
🍜 Mexico

Smoky, chile-marinated pork tacos with caramelized pineapple, fresh cilantro, and lime: a beloved classic Mexican street food perfect for casual summer gatherings.

⏱️ 1 hour 45Main Course ★ 4.8
Main Course
🍜 United States

Crunchy Fritos corn chips layered with savory beef chili and melted cheddar, topped with cool, zesty fixings for a beloved, cozy Tex-Mex comfort food.

⏱️ 35 minuteMain Course ★ 4.8

Cauliflower Grilled Cheese:Frequently Asked Questions

1.How do I keep the cauliflower 'bread' from getting soggy? ▾
Start by slicing your cauliflower into uniform ½-inch thick slabs, then pat every surface completely dry with paper towels before coating. The egg and parmesan layer creates a critical moisture barrier, so don’t skip it. Cook over medium-low heat slowly to evaporate excess surface moisture rather than steaming the slices, for a crisp, not mushy, 'bread' base.
2.Is this recipe actually 100% gluten-free? ▾
Yes, as written this cauliflower grilled cheese is entirely gluten-free, since it uses cauliflower slices instead of wheat bread, and the coating relies on eggs, parmesan, and garlic powder with no wheat-based binders or breading. Just double-check that pre-shredded cheese doesn’t have added wheat-based anti-caking agents if you avoid gluten for medical reasons.
3.Can I use a different cheese instead of sharp cheddar? ▾
Absolutely! Sharp cheddar is classic for its bold, tangy melt, but you can swap it for any good melting cheese you prefer. Try smoked gouda for deep savory flavor, pepper jack for a little heat, or mozzarella for that extra stretchy pull. Avoid crumbly, non-melting cheeses like feta as the sole filling, since they won’t get that signature oozing texture.
4.How thick should I cut the cauliflower slices to use as bread? ▾
Aim for uniform ½-inch thick slabs cut from the widest, center part of the cauliflower head for the sturdiest 'bread' slices. Skip the crumbly floret ends that fall apart easily, and save those for another recipe like cauliflower rice or soup. Thicker slices will be undercooked in the middle, while thinner slices will tear when you flip the sandwich.
5.Do I need to pre-cook the cauliflower before assembling the sandwich? ▾
No, you don’t need to pre-cook the cauliflower separately if you cook over the right heat. Cooking slowly over medium-low heat, 3-4 minutes per side before adding cheese, will tenderize the cauliflower all the way through while crisping the parmesan-egg coating. Pre-boiling or pre-roasting adds too much excess moisture and leads to soggy, floppy slices.
6.Can I make this recipe dairy-free? ▾
You can easily adapt this to be dairy-free with a couple simple swaps. Swap the sharp cheddar and parmesan for your favorite meltable dairy-free cheese alternatives, and use plant-based butter mixed with garlic powder for the garlicky pan coating. Look for dairy-free cheese formulated to melt smoothly, since many plant-based brands stay rubbery even when heated.
7.Why does the recipe call for both eggs and parmesan for the cauliflower coating? ▾
The eggs and parmesan work together to create that crisp, golden, sealed coating on the cauliflower slices that acts just like toasted bread. The egg acts as a binder to help the parmesan stick, while the salty, nutty parmesan toasts up to a crunchy crust that locks in moisture and keeps melted cheese from sliding off the smooth vegetable surface.
8.What heat setting should I use to cook this so it doesn’t burn? ▾
Stick to medium-low heat for the entire cook time, and resist the urge to turn the heat up to speed things up. The garlic in the butter coating and parmesan on the cauliflower burn quickly over high heat, leaving a bitter crust and undercooked, crunchy cauliflower in the middle. Plan for 6-8 minutes total cook time per sandwich for perfect results.
9.Can I add extra fillings to my cauliflower grilled cheese? ▾
Absolutely, just keep extra fillings thin and low-moisture to avoid making the cauliflower slices soggy. Great add-ins include patted-dry thin tomato slices, crispy cooked bacon, caramelized onions, thin ham slices, red pepper flakes, or a thin spread of Dijon mustard. Skip watery fillings like fresh pickles or salsa unless you pat them extremely dry first.
10.How do I flip the sandwich without the cauliflower slices breaking? ▾
Wait to flip until the first side is deeply golden and the parmesan crust is fully set, about 3-4 minutes. Use a thin, stiff spatula to slide fully under the entire cauliflower slice, and support the top of the sandwich gently with your other hand as you flip. Sturdy ½-inch thick slices with a fully set crust will hold together easily without breaking.
11.Can I make these in an air fryer instead of a skillet? ▾
Yes, the air fryer works great for extra-crispy cauliflower grilled cheese. Assemble the coated cauliflower slices, spritz lightly with oil, and air fry at 375°F for 5 minutes per side to crisp the coating, then add cheese between two slices and air fry 2-3 more minutes until melted. Keep a close eye to avoid burning the parmesan, as air fryer temperatures vary.
12.What’s the best way to store leftover cauliflower grilled cheese? ▾
Store leftover cooled sandwiches in an airtight container lined with paper towels to absorb excess moisture, and keep them in the fridge for up to 3 days. Avoid wrapping directly in plastic, as trapped condensation will make the crust soggy. For best results, reheat in a dry skillet over low heat or air fryer to crisp the coating, rather than microwaving.
13.Can I prep the cauliflower slices ahead of time for quick weeknight meals? ▾
You can absolutely prep components ahead to cut down on weeknight cook time. Cut your cauliflower slabs, pat them completely dry, and store them in an airtight container lined with paper towels in the fridge for up to 3 days. Wait to coat them in egg and parmesan until right before cooking, as the coating will get soggy if it sits too long.
14.I don’t have garlic powder — can I use fresh garlic instead? ▾
Yes, fresh garlic works beautifully for that signature garlicky butter coating. Mince 1 small fresh garlic clove per 2 tablespoons of butter, and sauté it over very low heat for 30 seconds to mellow the sharp raw flavor before adding the sandwiches to the pan. Keep the heat extra low to avoid burning the fresh garlic, which turns bitter very quickly.
15.Why is my cauliflower still crunchy in the middle even after the outside is brown? ▾
That almost always means your heat is too high, which browns the parmesan crust fast before the cauliflower has time to soften all the way through. Turn your burner down to medium-low, and cook the first side of the cauliflower slices for 4 full minutes before flipping, to give heat time to penetrate and tenderize the vegetable without burning the outside.
16.Is this recipe kid-friendly for picky eaters? ▾
Most kids love this recipe thanks to its crispy, cheesy, buttery flavor that feels just like classic comfort food, with no overpowering 'cauliflower' taste. If you have picky eaters, cut finished sandwiches into fun stick shapes for dipping in tomato soup, and use mild cheddar instead of sharp if your family prefers a mellower, less tangy cheese flavor.

Comments (4)

2 hours ago

OMG this cauliflower grilled cheese is a total game changer! My super picky 7 year old who refuses all veggies ate TWO whole halves for dinner last night and asked for more in his lunchbox tomorrow. Cook time was super quick too, perfect for busy weeknights when I don’t feel like slaving over the stove. 10/10 will be making this on repeat for meal prep!

30 minutes ago

Wait did you rice the cauliflower yourself or use the pre-riced bags from the grocery store? I’ve been wanting to try this but don’t want to mess up the crust texture!

5 minutes ago

So glad your kiddo loved it! Pre-riced cauliflower works perfectly here, just make sure you squeeze out as much excess water as you can before mixing to get that crispy, sturdy crust that holds up to all that melty cheese!

3 days ago

SO good! I brought this to my neighborhood potluck last weekend and people were begging me for the recipe the whole time. I added a little sprinkle of garlic powder and a dash of paprika to the cauliflower crust and it was chef’s kiss. Only note is I had to cook mine a couple extra minutes per side to get it nice and crispy, but that might just be my finicky old stovetop.

2 days ago

Love the garlic powder and paprika addition! That sounds absolutely delicious. You’re totally right that cook times can shift a little depending on stovetop heat, so cooking to that perfect golden crisp is always the right call. Thanks for bringing this to a potluck and sharing it with your neighbors!

1 week ago

This was so easy to throw together! I made a big batch on Sunday for quick work lunches all week, and it reheats way better than I expected in the air fryer. I used a mix of sharp cheddar and pepper jack for the cheese filling and it had the perfect little kick. Will 100% be a weekly staple from now on.

yesterday

Wait, is the cauliflower actually the 'bread' here? I’ve tried other cauliflower crust recipes before that turned into a soggy, crumbly mess the second I picked them up, so I’m skeptical but curious. Does this actually hold up like regular grilled cheese, or do you need a fork and knife to eat it?

2 hours ago

I was super skeptical too! Just make sure you squeeze every last drop of water out of the cauliflower after you rice it—like, wrap it in a clean kitchen towel or cheesecloth and wring it out until not a single drop comes out. Mine held together perfectly, no fork needed! I was shocked how much it tasted like the classic grilled cheese I grew up eating.



